Back to baking macarons
It has been quite a while since I last baked macarons*, but since my little one has been asking me to make pink ones for the past month or so, plus I promised my sister last year I would be bringing her macarons the next time we visit (which is next month!), I figured it’s time to give baking cakes and cupcakes a rest and start refreshing—and improving—my macaroning skills… So, the few posts about food I will be making prior to our scheduled travel would most likely be about macarons.
* emphasis on the single «o», so as to differentiate them from macaroons, the cookies made mostly of desiccated coconut meat.
I’m not really a newbie when it comes to macaron-baking. I learned how to make them more than 6 years ago, after a trip to Nice (no, not Paris, ironically considering we’ve just been there several months earlier). The recipe I used were mostly based on Helene Dujardin’s recipes, found on her blog, Tartelette. She uses the French meringue method, which uses uncooked meringue as a base. As it turns out, this method was not exactly the best one to use if you’re both an amateur and a beginner—I found out, the hard way. Even when you follow the instructions to the dot, there is still a big chance something would go wrong. Overwhip or underwhip the egg whites and you end up with hollow macaron shells; overmix the batter and you end up with flat macaron shells; use flavors and food colors other than the powdered varieties and you risk having the batter too wet, resulting in the drying time (croûtage) taking forever; then skip the drying time, or even just an inadequate drying time, and you’ll get either footless and porous macarons, or ones that have cracks on the top surface, or both (I even got ones that turned gummy)… I’m not saying that these won’t happen in the other method/s, because honestly speaking, I didn’t know at the time that there were alternative methods, or for that matter, why my macarons were turning out fine at one time, then not so the next. However, what these mishaps did was to encourage me to find out what the reasons were behind them. So I started buying some books about macaron baking: Cecile Cannone’s Macarons, José Maréchal’s Secrets of Macarons, and last but not the least, Pierre Hermé’s Macarons. It was through these books that I learned about the Italian meringue method, which cooks the meringue by adding hot sugar syrup into the egg whites as they are being whipped to stiff peaks. I was intimidated at first—the method sounded too technical and complicated—but the fact that all three books preferred the Italian meringue method over the French one (Pierre Hermé didn’t even mention it in his book) spoke volumes.
Perhaps using Italian meringue as a base leads to less temperamental macarons? I decided I would give it a try, and now is as good a time as any. After all, I don’t want to be bringing my sister cracked, gummy, porous, and/or footless macarons as pasalubong (visiting gifts)—that would be embarrassing. 😳
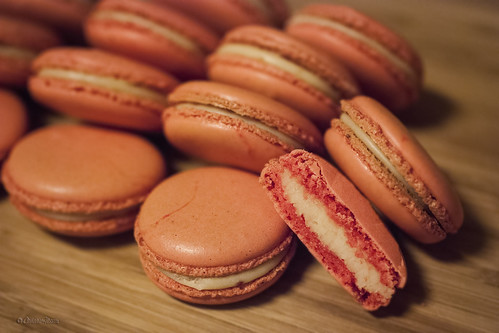
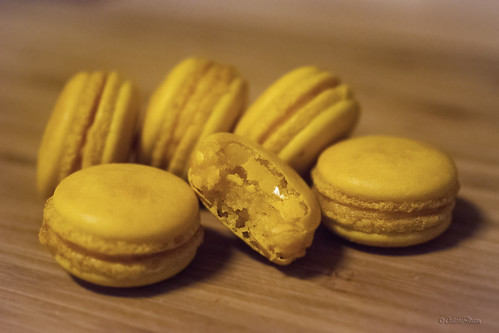
Thus I spent 4 days last week baking two flavors: Strawberry macarons with strawberry ganache and Mango macarons with peach-mango curd. The first flavor was because my little one wanted pink macarons; the second one was because, well, I just wanted to 😉
Strawberries and cream macarons
Strawberry macaron shells
Makes about 48 shells (24 filled macarons)
100 g finely ground almonds (almond meal/flour)
100 g confectioner’s sugar
5 g freeze-dried strawberries, ground to a powder
1 g powdered red food color (or 1-2 drops red gel food color)
1-2 drops strawberry essence (i.g. LorAnn Oils)
37 g egg whites (from approximately 1 egg)
100 g granulated sugar
37 g egg whites (from approximately 1 egg)
25 g water
- Line baking trays with baking paper, silicone macaron mats or silpat (I used the silicone mats).
- Tant pour tant: Grind the ground almonds, confectioner’s sugar, freeze-dried strawberry powder, and powdered food color in the food processor. Sift the mix into large bowl. Place the pieces that won’t go through the sieve back in the food processor and process until everything goes through the sieve. Make a well in the center of the tant pour tant.
- Stir the gel food color (if using) into the egg whites. Pour the egg white mixture in the middle of the tant pour tant but do not mix. Set aside.
- Italian meringue: Place the water and sugar in an appropriately sized saucepan. Place a digital kitchen thermometer (I used a digital meat thermometer with an alarm function) in the center of the pan with the sugar mixture, and heat over medium heat until the sugar syrup boils and reaches a temperature of 118°C. DO NOT STIR, but you can swirl gently.
- Place the second batch of egg whites in the bowl of a standing mixer fitted with the whisk attachment. When the sugar syrup temperature reaches past 110°C, begin whipping the egg whites at high speed until soft peaks form.
- As soon as the sugar syrup reaches 118°C, remove from heat and pour in a thin stream into the egg whites while continuing to beat at high speed. Beat one more minute, then lower the speed to medium and beat for about 2 more minutes. Cool to 50°C (or lower) before adding into the tant pour tant.
- Macaronage: You can add the meringue in 2 batches (although Pierre Hermé in his book does it in one go). Using a spatula, fold the meringue into the tant pour tant by pressing the batter from the center of the bowl towards the sides, then scraping the batter from the sides and bringing it towards the center. Repeat this pressing and scraping action while rotating the bowl until the batter becomes homogenous in color. Add the second batch of meringue (if using 2 batches), then repeat the pressing, scraping and rotating procedure until the batter becomes shiny and homogenous in color.
- Once the batter is shiny and homogenous, check for the consistency. Using the spatula, lift a small amount of batter and let it drop from the spatula. If the batter drops in clumps, fold a couple more times then check again. The batter is ready for piping when it drops from the spatula in ribbons that smooth themselves back into the rest of the batter within 15-20 seconds. Alternatively, check how the batter flows: tip the bowl slightly to one side and watch how the batter moves. If the batter moves like slowly flowing lava, it is ready.
- Spoon or pour the batter into a piping bag fitted with an 8-10 mm diameter round nozzle (Wilton 1A or 2A), taking care not to add air bubbles into the batter as you are doing so.
- Pipe out 35 mm circles, each about 20 mm apart, onto the prepared baking sheets. Rap the sheets on the counter top to smoothen the tops of the macarons (in case there are stubborn peaks that formed while piping) and to dislodge/remove excess air from the batter.
- Croûtage: Let the macarons rest for 15-30 minutes, or until they have formed a thin crust, their surfaces are dull in color and are no longer sticky when touched.
- Preheat the oven to 150°C-160°C (this depends on your oven; mine is hotter than what it says on the dial, so I use 150°C).
- Once the oven is done preheating and the macarons are dry and ready, place one of the baking sheets on the lower third of the oven—you can only bake one sheet at time. Bake for 10-12 minutes (again, this depends on your oven; in my case, I check for doneness after 10 minutes), briefly opening the oven at least once after 8 minutes to let out steam/moisture. The macarons are ready when the tops are firm to the touch and they do not wobble.
- Remove from the oven and slide the baking paper/silicone/silpat with the macarons still on it from the baking sheet onto a wire rack. Let the macarons cool on the baking paper/silicone/silpat. Once cooled, they can be removed easily from the baking surface (peel the baking surface from the macarons, and not vice-versa); any macaron with the bottom still stubbornly sticking to the baking surface is undercooked—pop them back into the oven and bake a couple more minutes.
- Pair the finished macarons and allow to rest on wire racks with half of them lying foot side up. Cool completely before piping the ganache.
Strawberry ganache
200 g white chocolate
100 ml pouring cream (or whipping cream)
5 g freeze-dried strawberries, powdered
1 drop strawberry essence
15 g butter, diced
- Chop or grate the chocolate into small pieces so they melt evenly.
- Place the cream in an appropriately sized saucepan. Add the freeze-dried strawberries and essence. Bring the strawberry-cream mixture to the boil.
- When the strawberry-cream mixture starts to boil, remove from heat and pour over the chocolate. Stir using a whisk until minxture becomes homogenous.
- Cool the ganache slightly. When the temperature has cooled down to 40°C, stir in the diced butter. Continue stirring until the ganache becomes smooth.
- Spoon into a piping bag fitted with 8 mm diameter round nozzle (Wilton 2A).
Assembly
- Pipe the ganache onto half of the macarons (those with the foot side facing upwards), leaving about 3 mm from the edges ganache-free.
- Top the ganache with the remaing macarons.
- Leave the macarons to «mature» with the fillings for 24 hours, or at least overnight.
Peach-Mango macarons
Mango macaron shells
Makes about 48 shells (24 filled macarons)
100 g finely ground almonds (almond meal/flour)
100 g confectioner’s sugar
5 g freeze-dried mangoes, ground to a powder
1-2 drops yellow gel food color
1-2 drops mango essence (i.g. LorAnn Oils)
37 g egg whites (from approximately 1 egg)
100 g granulated sugar
37 g egg whites (from approximately 1 egg)
25 g water
- The same procedure as the strawberry macarons above.
Peach-mango curd
Adapted from These Peas Are Hollow
200 g ripe mangoes (I used tinned slices)
200 g ripe peaches (I used tinned slices)
100 g sugar
3 tbsp lemon juice
4 large egg yolks
pinch of salt
62 g unsalted butter, cut into 1 cm cubes
- Place the mangoes, peaches, sugar, lemon juice and salt in a blender/food processor and blend until smooth. Add the egg yolks and blend for another 15 seconds.
- Place the puree mixture in a medium glass bowl set over a saucepan of gently simmering water. Place a digital kitchen thermometer in the middle of the glass bowl and whisk the puree constantly until the temperature reaches 77°C and the mixture has thickened (this takes about 10-15 minutes). Remove from the heat, then whisk in the butter one piece at a time. Let cool slightly, then transfer into an air-tight container. Refrigerate at least overnight.
Assembly
- Spread one teaspoonfuls of the curd onto half of the macarons (those with the foot side facing upwards), leaving about 3 mm from the edges free from filling.
- Top the filling with the remaing macarons.
- Leave the macarons to «mature» with the fillings for 24 hours, or at least overnight.
Epilogue
As you can see, my macarons aren’t perfect yet… The peach-mango macarons, particularly. The shells had a splotchy color on the surface, plus the matrix (interior of the shell) was a bit too «bubbly»—it wasn’t hollow with one big air pocket. This is mainly because I did an improper macaronage and ended up overwoking the batter while at the same time not being able to beat enough air out of the macarons. Also, it turns out, using curds—which have higher moisture content than either buttercream or ganache—as fillings is not exactly a good idea when your shells are porous and «bubbly» in the first place. They still tasted great, though… 😋


Comments